Wednesday, August 30, 2017

Burnt to a Crisp

     There is a running (but gentle) competition between my son and my SIL as to which of them is the best chef.  Needless to say, that includes BBQ foods as well.  So this card will end up being a birthday card for one of them, but I'm not sure which at this point.


I put the birthday sentiment on the inside.


That die cut sentiment was a gift from the lady who sent me 
her card this month in the Card Chain Challenge exchange.
Thanks, Denise!

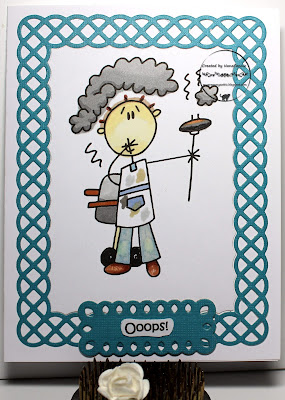
     I used my ProMarkers to color the image (Bugaboo Stamps), then cut and framed it with a lattice die (Spellbinders.)  The image is actually inset into the frame.  The sentiment was printed and then adhered to another die cut (same Spellbinders set.)

     The card is really CAS but then, it's a masculine card and may have to be mailed if it goes to my son.  :-D

     Challenges:
Catch the Bug
City Crafter
Crafty Sentiments
Cutie Pie
Dream Valley
Outlawz Twisted Thurs.
Pammie's Inky Pinkies
Paper Girls
Passion for ProMarkers
TTCRD

     I'll be home, blogging and crafting, for a couple of days starting this evening, then I'm taking off again for the Labor Day weekend.  First thing I have to do is write up the last of my 4 posts for Friday (3 are already done and pre-scheduled) and then I can relax (?) in the record breaking heat that still holds California in its grip.  I'm thinking fondly of all of you who feel like you've had no summer at all.  And I'm saying prayers for all of Houston and New Orleans.  Happy Crafting to the rest of you.  NanaConnie
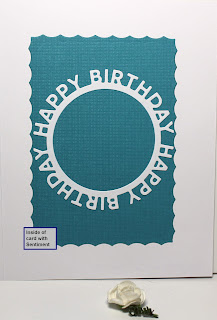
Tuesday, August 29, 2017

Window in Autumn

     Sharing another autumn card with a delightful image from Beccy's Place.  I think it's called Autumn Window but it's in the set of seasonal windows Beccy has done.  I love all four of the windows in the set - one for each season.  I've used this fall window a couple of times before but each time I color the stonework differently.  This time, I used dull yellows, browns, and grays.


I used the sketch from Sketch Saturday
but turned it sideways.


     I colored it with my ProMarkers, using the ultra fine tips for the branches and the smallest leaves.  I cut it with the largest square die in the first die set I ever bought from Spellbinders.  I inked the edges twice to make it look matted and layered it onto patterned dp from Jillibean Soup.  Then, I did the sentiment, printed and hand cut.

     For simple embellishments, I used pumpkins in the lower corner (cut with dies from Impression Obsession) and leaves in the upper corner (cut with a die from Dies R Us.)  I added sheer beige ribbon which I tied by hand.

     Challenges:
Colour Crazy
Come and Get It
Craft-Dee BowZ
Glitter n Sparkle
Jo's Scrap Shack
Outlawz PAM

     Happy Crafting.  NanaConnie

Sunday, August 27, 2017

Embroidered Flowers

     I shared my embroidered kitten with you last week and promised you more cards with appliques as I got them made.  This one today was done using the very first patterns I tried on the new data card for my sewing machine, but these are not the first samples I did.

     For these, I invested in some spools of variegated embroidery threads which I used for the stems and leaves.  The darker threads in the pink and yellow flowers were done by using the computerized program and changing the thread when the program stops and tells you to change thread.  Very simple and those two parts of the program were done last.


     No coloring, obviously, but I adhered two colors of CS together, then cut them as one piece with a stitched die from Die-namics.  I used fabric glue to adhere the embroidery to that.  The background dp came from the Whimsy stack by DCWV and I wrapped it one time with a narrow, green ribbon.  I added one of my hand sewn bows and it was complete.  I didn't want anything to take away from the shine of the embroidery.

     Challenges:
A Bit More Time to Craft
Crafts Galore Encore
Crafty Hazelnut's Patterned Paper
Lil Patch of Crafty Friends
Not Just Cards
Petal Lu
World Wide Open DT

      I have a couple of posts scheduled for this week but the big day will be Friday when I'll have a total of 4 posts!  All of my DT work seemed to fall on the same day this time although only one is a regular Friday post.  The others were either for the 1st of the month or the 1st Friday and this month, they all came together on that day.

     Happy Crafting.  NanaConnie

Friday, August 25, 2017

Love in Tennis

     Another Friday, another QKR Stampede "Anything Goes" challenge but, as usual, we also have an optional theme if you want to use it - "Any Sport with a Ball."   I thought "Tennis Duck" was a perfect image for that theme and grabbed him from the shop as quickly as I could.


     I printed the image and sentiment right onto the card front.  I used chalks and ProMarkers to color the image, then cut a blue frame with a Gina Marie die.  The frame is laid right on top of the image making it look like two or even three layers.  I wrapped jute cord around the card front and tied baker's twine around the cord.

     Challenges:
Addicted to CAS
Addicted to Stamps & More
Glitter n Sparkle
I {heart} ProMarkers
Lil Patch of Crafty Friends
Pammie's Inky Pinkies
Paper Girls
Scrapper's Delights
Send a Smile 4 Kids
Stamping Sensations

     Extreme hot weather is back so I'm running away for another week.  I'll be back for a couple of days and then gone again over Labor Day.  But I have four posts scheduled for the 1st of September, all DT work, so feel free to visit.  I'll visit with all of you when I get back.   Happy Crafting.  NanaConnie

Thursday, August 24, 2017

Teabag Folding for a Birthday

     This is my first attempt at 'teabag folding' on a card and it's time consuming but something I will no doubt try again since I really like the end result.

     There's nothing all that fancy about the actual folds - just strips of dp folded in half - but layering them properly to get the effect I wanted took some time since I was working without specific instructions.  I had a photo of a project someone else had done and I was working from that but working from the back when you're looking at a photo of the front... yeah, not the easiest thing.  lol


     I used a die cut, CS frame made by using two dies from a Spellbinders set and all the papers are layered onto it from the back.  All the papers came from a card kit which had been in my stash for at least 4 years.  I never did make any of the suggested cards, but at least the papers and one of the the sentiment pieces were used here.

     Once all the papers were layered onto the back side of the frame, I added dimensional foam tape to adhere it to the card front.  I added the sentiment and the polka dot bow and left it alone, wanting the focus to be on the folded papers.

     Challenges:
Crafting by Designs
Crafting with an Attitude
Crafty Creations
Die Cutting Divas
Penny's Paper-Crafty
Scrapy Land
TTCRD

     Happy Crafting.  NanaConnie

Wednesday, August 23, 2017

Toil and Trouble

     For those of you who question whether or not I know it's only August, yes, I do know.  Despite that, I posted my first Thanksgiving card on Monday and today I have my first Halloween card.  But I was a winner in the FB challenge at Sasayaki Glitter and chose this image as my prize.  Then I just couldn't wait to get it colored up and made into a card.  :-D  It's called "MacBeth Witches" and it makes me think of the Hogwart's Choir singing "Toil and Trouble" in the first of the Harry Potter musical scores, a favorite of mine.

     The theme at the Sasayaki Glitter blog challenge is "Colors of the Rainbow" so I did my best to use as many colors as possible, while still having a Halloween color palette.


     I used a combination of ProMarkers, chalks, and polychromos pencils to color.  I cut the image with a stitched, rectangle die from Die-namics.  I layered together two scraps of CS, then used the same die to cut a window in which I inlaid the image so it becomes all one layer.  I added the sentiment and a small gingham bow and called it finished.  A delightful CAS design which will be easily mailed.

     Challenges:
Color Inspiration Monday
Crafty Sentiments
Cupcake Inspirations
Digi Choosday
Get Creative
Pammie's Inky Pinkies
Sasayaki Glitter
TTCRD

     This is the mid-day of the week so we're closer to the weekend than we were yesterday.  Hooray!  Happy Crafting.  NanaConnie

Tuesday, August 22, 2017

Groovy, Man!

     I'm doing a second post today because I'm running out of time to get this entered into the challenge at Aussie Digital Artists and I'm using their freebie offered by My Stitch Back in Twine.  Since I was a California girl back in the "Flower Child" days of the 60s and 70s, I just couldn't let August go by without doing something with this image!


     I printed the image onto cardstock and then used my watercolor paints to color it.  I cut it with a simple rectangle die from Spellbinders.  In keeping with the time period, I used neon orange CS to make the card base.  I added the black doily, the sentiment, and one, sparkly daisy adhered with Pop Dots for a touch of dimension.

     Challenges:
Aloha Friday
Brown Sugar
Crafty Addicts
DL.ART
Jo's Scrap Shack
Sasayaki Glitter

     Enjoy your day and Happy Crafting.  NanaConnie

Last Flamingo on the Beach

     It's a sure thing that summer is coming to a close when you find only one flamingo on the beach, looking for that last drop of sunshine to tan his pink feathers.  Or maybe all the rest of them just got scared away by yesterday's solar eclipse?


I used colors from the Ellen Hutson Pin Sights challenge.

5f9076c9c287ff2296554f84f0423b43

     The image is from the Sasayaki Glitter FB progressive challenge.  I colored with my ProMarkers and cut it with an Unbranded die.  The paper is from an old DCWV stack.  I printed the sentiment and fussy cut it.  I added ribbon from my stash, plus one of the bows I make up by the dozens and have ready as needed, and found an anchor charm which seemed good for the beach theme.

     Challenges:
Brown Sugar
Crafty Creations
Crazy Challenge
Creative Inspirations
Incy Wincy
Lemon Shortbread
Outlawz Festive Friday

     Happy Crafting.  NanaConnie

Monday, August 21, 2017

Harvest Scarecrow

     Well, I keep telling myself it's almost fall and that this hot, hot, hot summer will finally be over.  I'm trying to hurry it along by doing cards appropriate for fall and the holidays like Halloween and Thanksgiving.  This week, I'll share my first cards for each of those.  Here's one for Thanksgiving.


Knowing I wanted something for autumn, 
I took my fall colors from the inspiration


     This adorable image with the scarecrow and the owl is from Bugaboo Stamps and I'm entering their Bingo challenge by using the top row (gem, red, brad.)    I colored with my ProMarkers, then cut the image with a plain, square die (Spellbinders) and used a corner punch on it.  I die cut another larger square piece from yellow CS and used the same corner punch on it.

     I put the image onto dark brown CS, then added that piece to the yellow mat.  I found some metal, triangle brads and added them to three of the corners.

     I used burlap paper from my stash to make the card front, and then decided to use the same corner punch on the card itself.  When it came to embellishment, I added the paper flower with a gem in the center and called it finished.

    Challenges:
Crafty Friends
Delicious Doodles
Jo's Scrap Shack
Lemon Shortbread
Lil Patch of Crafty Friends
Scrapper's Delights
Simon Says Stamp
TTCRD

     I'll see you tomorrow with another card which also celebrates the end of summer.  I apologize to those of you in the UK who feel you've had no summer at all this year but out here in California we're roasted, toasted, and overdone!  :-D  Happy Crafting.  NanaConnie

Sunday, August 20, 2017

Empty Dish

     Hmmmm, chickens on Friday and cats on both Saturday and Sunday!  But then, I love cats -- and I love Sami Stamps, and I love card making so this one was a natural.  It also reminds me of Honey Cat (see sidebar) who has gotten rounder and rounder and rounder and still gives me 'that look' !


     I colored Fat Cat, excuse me, Round Cat with my ProMarkers and cut the image with a simple circle die from QuicKutz.  I used another QuicKutz die to cut the polka dot dp and a Memory Box die to cut the bright pink dp, then inlaid them behind the cat.  The sentiment and both matting pieces behind it were cut with a smaller die from that same Memory Box set.

     I added everything to a black card front, found three tiny, sparkly flowers and a bright pink butterfly (also very tiny) and used those for embellishment, leaving the overall design pretty CAS.  This was one of those quick and easy, git 'er done cards that I am going to send to a kid I know who is also a cat lover and who will appreciate it with childish delight.  :-D

     Challenges:
A Perfect time to Craft
Colour Crazy
Die Cut Divas
Love to Scrap
Not Just Cards
Outlawz Twisted Thursday
Paper Creator
Polkadoodles
Sami Stamps
Take It, Make It

     I hope you're having a fantastic weekend and that the weather is good wherever you are.  If it's lousy in any way, use that as an excuse to stay inside and be creative!  Happy Crafting.  NanaConnie

Saturday, August 19, 2017

Embroidered Kitten

     For the last 7 years or so my once-beloved sewing machine has taken a backseat to my paper crafting.  In fact, when I moved nearly 4 years ago, I left the embroidery attachment and the quilting kit packed away although I did unpack my actual sewing machine.  I've done a few things with it, mostly Christmas projects, but for the most part it has been tucked away in a corner, sad and lonely.

     Last weekend, I dug out the embroidery attachment because I had been given a new-to-me data card for the machine, filled with cute animals and insects and flowery patterns normally used for dressing up kids clothes or even household linens.  What I hadn't thought about was the possibility of making embroidered appliques but after testing one or two of the small flower patterns on some scraps of muslin, here's what happened (see card below.)  I think I may have discovered a new addiction (plus a way to combine my two favorite things - sewing and card making) !!


     What do you think?  Once I had the machine set up and programmed with the data card, it took about 9 minutes for the machine to make the kitten; I had to change thread for the kitten's ears and again for the butterfly (twice).  But it took me longer than all of that to hand cut the applique with scissors (Note to self - get your tiny embroidery scissors sharpened!) keeping the kitten and butterfly all together as one piece.

     Obviously, the "coloring" was done with the various threads instead of my usual markers but I did have to choose the threads.  Once it was cut out, I used white fabric glue to attach the applique to some scrap CS, then trimmed that to fit.  The CS acted as a stiffener so that the kitten wouldn't curl.

     I die cut the scalloped circle with a die from Memory Box and the scalloped frame was cut with a Sue Wilson die, then run through my 'Linen" embossing folder.  I glued the applique to the circle, then layered it onto the Sue Wilson piece, and all of that went onto a piece of dp from the Linen Closet stack by DCWV.  I chose papers that had beautiful Wedgewood blues to compliment the blue-gray of the kitten, but in the photo the blues look more "sky" blue.

     The only other thing needed was the little satin bow and it was finished.  I see many more of these in the future.  However, I'm now going to have to start budgeting for more data cards for the embroidery attachment.  Why does everything crafty that I love end up costing so much?  :-D

     Challenges:
Butterfly
Craft-Dee BowZ
Crafting by Designs
Crafty Creations
Kraftin' Kimmie
Outlawz Twisted Thurs.
Paper Shelter
Scrapy Land
SUYP Cats
WordArt Weds.
World Wide Open DT

     Well, that's it for me today.  I'm going back to the sewing machine and make up more appliques from some of the flower designs.  I'm sure with more practice I'll get better and things will go faster.  I've already promised myself that I'll make at least two of each applique design on that data card, using different color combos and put them in my stash before I go and buy another one.  The cards run from $35 to $75 depending on how many designs are on it.  See, I told you it would be an expensive addiction!  :-D  Happy Crafting.  NanaConnie

Friday, August 18, 2017

1 Plus 1 = 3

     That post title will probably tell you that I'm not all that good at math but my card will tell you that I definitely know how to count my chickens!

     Today we have another new challenge at QKR Stampede and if you enter our "Anything Goes" (optional theme of "Shaped Cards") challenge, you might be a winner!  For my DT card this week, I combined two QKR stamps:  "Proud Mamma Hen" and "Fluffy Chicken" (though on this card he's a fluffy rooster.  :-D)


     I used a combination of Copics, ProMarkers, polychromos pencils, and gel inks to color the combined images.  I used a border die from Spellbinders to cut and emboss the image piece.

     The card itself is cut with a die from QuicKutz.  The image piece is mounted onto dimensional dots.  The sentiment is printed, hand cut, matted with a scrap of dp, and hand cut again.  Fairly CAS card but for the die cut borders making it look more complex.

     Challenges:
A Bit More Time to Craft
Classic DT Open
Crafts Galore Encore
Crafty Awesomeness
Creatalicious
Create and Inspire
Not Just Cards
Petal Lu
Stempelsonnen

     Come play with us, won't you?  How can you miss with a theme like "Anything Goes?"  Remember you can use stamps/digis from any company but if you use a QKR image, your entry will be in a completely separate draw for QKR image entries only and that will increase your chances of winning considerably!  Happy Crafting.  NanaConnie

Thursday, August 17, 2017

Elegant Dining

     I love Rick St. Dennis images and the whimsy he builds into his images of critters large and small, but especially his sassy felines.  This is an image I've had for a while but somehow never used until now.  Based on Tomcat's fine, silk, smoking jacket and silver fork, I just know this is the best there is in a feline's elegant dining!


     I colored with my ProMarkers and then cut the image with a stitched die from Gina Marie.  The dies from that set are all rectangles, but I shifted the die over, cut a second time, and got a square for the image.  I cut a simple rectangle for the red CS background and added golden yellow, satin ribbon before mounting it onto the card front.  I tied the gingham bow by hand and then heat embossed the sentiment with silver EP.

     Challenges:
Crafting from the Heart
Crafty Friends
Cutie Pie
Sparkle n Glitter
Jo's Scrap Shack
Lil Patch of Crafty Friends
Outlawz CAS
Pammie's Inky Pinkies
Stamping Sensations
SUYP Cats

     Now that he's won the fishing derby, and the rat catching contest, he's retiring to his chef's kitchen to see if he can take top honors in the cooking and eating competitions. lol  Happy Crafting.  NanaConnie

Wednesday, August 16, 2017

Blueberry Summer

     Summer has been hot, hot, hot where I live with nearly twice as many 100F + temperatures as what we normally have but I will say that means we have a bumper crop of juicy berries at the farmer's markets this month!  I decided to celebrate that fact with this cute little card featuring a Blueberry Sprite from AuroraWings.


I was inspired by the sketch from the challenge
 on the AuroraWings Facebook page
and the colors from House of Cards.

No automatic alt text available.  

     I colored the sprite with my ProMarkers and added some gel ink highlights.  I cut the image and the two smaller circles with stitched, scalloped dies from Memory Box.  

     For the background, I started with a piece of dp that had polka dots, then did a water color wash over it, changing and blending the colors as I went.  After it was dry, I spattered water droplets across the top, moved them around a bit by tilting the paper back and forth, then let it dry.  The result is the water spot marks in the top corners.  They are on both corners but the right hand corner is so light it doesn't show in the photograph.

     After the background was completely dry, I ironed the paper to flatten it, then added a strip of deep, purple ribbon before adding the die cut circles and the image piece.  I hand cut the printed sentiment, then added the sheer bow.

     Challenges:

     OK, after today we're on the downhill slope to the weekend when our hearts and souls will be filled with a need to craft, craft, craft!   So, Happy Crafting.  NanaConnie

Tuesday, August 15, 2017

Createful Hearts Challenges

     I'm going to start this second post of the day with some wonderful news, kind of unexpected but delightful.  I was chosen to be on the Design Team at Createful Hearts!   I applied, not really expecting anything wonderful (like being chosen for the team), and within a few hours of applying, I received an invitation to join them.  I was so excited!  This is a brand new blog challenge, separate from and in addition to what you'll see on the Facebook page.

     The first challenge begins today, runs for a month until September 14, and the theme is everyone's favorite "Anything Goes."  The DT is showcasing three different images today and mine is "Princess Annabelle."  I adore this little ballerina.  To see the other two images and what the DT have done with them, please go visit the blog, won't you?


I started with the sketch from Sweet Sketch Wednesday.

     I used my ProMarkers to color the image, adding in the floor to make it an indoor scene.  I cut it with one of my stitched dies from Lawn Fawn, and added a dark brown mat (piece of scrap.)  The ribbon came from Really Reasonable Ribbon (also scraps left over from a previous project) and the striped background was a leftover from a 12x12 sheet of scrapbooking paper.  I do love using up scraps!  :-D  I added dimensional daisies and pearls for embellishment and texture.

     Challenges:

Di's Digi Designs
Hiding in My Craft Room
Jo's Scrap Shack
Morgan's Artworld
Pattie's Creations
Polkadoodles
Send a Smile 4 Kids
Stamping Sensations

     I hope you'll come and join us by playing in this new challenge.  With so many challenges closing their doors recently, it's wonderful to see a new one starting up.  :-D  Happy Crafting.  NanaConnie

Bottled Heather

     I have strong Irish roots in my family tree and, while I've never been there myself, I remember one of my great-uncles sharing about the wonderful scent of heather when it was blooming on the 'moors' in Ireland.  Every time I see this particular bottle image from MHK Designs (Beautiful Bottles set), I think of him.

     I also used flowers from another set by MHK Designs.  I thought they really worked well together and provided exactly what I wanted for the sketch.


I started with the sketch from The Outlawz.


     I used my ProMarkers to color both the bottle and the flowers.  I fussy cut all of the pieces and then used a die from QuicKutz (oval with scallops) and another die from Spellbinders (plain oval) to cut the framing pieces from (my favorite color) purple and lavender CS.

     The diagonal cut, kraft CS was embossed with my "Linen" folder and then attached to the card front.  I layered on the ovals and added the bottle and flowers, centering them as much as possible to fit the A2 card width.  One row of purple rhinestones and a small sheer bow finished off the card in style.  I do believe that those tiny bows I sew up are my favorite embellishments of all time.  I make  them by the dozens and always have them in my stash.  Mostly I make them from white ribbon because then they can be 'dyed' with markers I've used in my coloring to match whatever color I want for the cards.  Besides, bows work on either fancy or CAS cards, for gals or for guys.  A very versatile embellishment.  :-D

     Challenges:
As You Like It
C.R.A.F.T.
Crafting with an Attitude
Day Dreamer
Fussy and Fancy Fri.
Outlawz Twisted Thurs.
Pammie's Inky Pinkies
Star Stampz

     I have two posts today and my second one shares some exciting and very recent news so be sure to stop by again in a few hours.  Happy Crafting.  NanaConnie

Monday, August 14, 2017

Live, Love, Laugh

     This card features another of those I-colored-it-and-put-it-into-the-file-folder-for-future-use but this time I know exactly who created the image.  It's from Whoopsi Daisy.  Strangely enough, when I try to get to their blog site, I get an error message that the blog has been removed.  Weird!  (Edited to note:  I heard from Linnie and she has closed the blog but the store is still open.)


I started with the sketch from My Favorite Things
but I flipped it side to side.

Sketch Challenge 345 #mftstamps

     I used my ProMarkers to color the image, then cut it with a die from Spellbinders.  The circle die cut with the butterflies is also from Spellbinders.  I layered those together and then added them to a scrap piece of blue CS which was embossed with my "Linen" folder.

     The pink, blue and purple background was done with alcohol inks which were sprayed with alcohol and left to dry, then ironed flat.  I added a shiny, silver-edged, royal blue ribbon to it and mounted it onto the card front.  The sentiment(s) was heat embossed with white EP.  I added one white rose and the tiny blue bow for embellishment.

     Challenges:

     I hope your week is going to start well and progress to things even better.  Happy Crafting.  NanaConnie

Sunday, August 13, 2017

Mother Earth

     OK, yesterday I did the Element of "Fire" for AuroraWings and today it's another card but this time with the Element of "Earth."  This AW image is called "Autumn Rose."


I was influenced by the colors at Outlawz,
well, pretty much, all but the blue. 
Fortunately, they only wanted 3 colors out of the 5
and a vintage flavor.


     I've colored this image several times before in bright reds and pinks, even a deep purple one time, but since this card was being used to represent the element of Earth, I colored her in the rich but subdued tones of autumn with woodsy tans, browns, and olive greens.

     I colored her completely with ProMarkers, then cut her with a stitched die from Die-namics.  I cut the deep brown frame from a scrap of CS with another of those same dies, and then did an out-of-the-box (literally) layering of the image piece onto the frame.  I used a scrap bit of text dp behind both of those die cuts and wrapped it all with left over scraps of forest green ribbon.

     I tied a quadruple loop bow using my bowmaker and added two metallic brads above and below the bowtie.  The sentiment is written with a VersaMark pen and heat embossed with white EP.  Ask me if I feel proud of myself for using up all those scraps!  :-D

     Challenges:
C.R.A.F.T.
Day Dreamer
Delicious Doodles
Die Cuttin' Divas
Digi Choosday
Lil Patch of Crafty Friends
Paper Shelter
Pixie's Snippets

     We're halfway through the weekend.  Have you had your crafting fix yet?  :-D  Happy Crafting.  NanaConnie

Saturday, August 12, 2017

Elements - Fire

     I love the challenge theme at AuroraWings this month - Be Inspired by one of the 4 Elements: Earth, Air, Wind or Fire.  I chose this wonderful AW image "Enchanted Visions" and did it in the colors of fire.


This one is based on the sketch from Creative Sketchy Girls.


     The background is done with watercolor paints and the girl and fairies are colored with my ProMarkers.  I had to be very careful with the watercolors around the fairy wings but it worked out OK.

     I cut everything into squares; the image, both background pieces and the card base.  I embossed the two CS pieces with my Linen folder, then arranged everything on the card front.  I wrapped it all with two ribbons from my stash and tied one of them into a bow.

     I didn't do any sentiment because I thought the image spoke for itself.

     Challenges:
Color Inspiration Monday
Crafting By Designs
Crafting from the Heart
Crafty Addicts
Incy Wincy
Kraftin' Kimmie
Pammie's Inky Pinkies
Through the Craft Room Door
Unicorn

     That does it for me today.  I have a busy weekend planned but I'll be posting again tomorrow, maybe even twice depending on how much I get done.  :-D  Happy Crafting.  NanaConnie

Friday, August 11, 2017

Music to My Ears!

     It's Friday again so you probably know what that means if you visit my blog regularly.  :-D  This week at QKR Stampede we're giving you an optional theme of "Music" but if you don't want to use it, you're welcome to just enter under our usual "Anything Goes" theme.

     I had two favorite musical images and couldn't decide between them so combined them into one card; "Cat Calling" and "Country Crooning."  Now they look like they're having a party, don't they?


     I colored all of them with my ProMarkers and cut them with a plain rectangle die from QuicKutz.  Both background papers came from an old Recollections stack and the ribbon is from Really Reasonable Ribbon.

     I did it as a pretty CAS design because I knew it would end up in my stash of masculine cards.

     Challenges:
Craft-Dee BowZ
Card Mania
Ching-Chou Kuik
Classic DT Open
Crafts Galore Encore
Crafty Hazelnut's Patterned Paper
Create and Inspire
Sisterhood of Crafters

     I hope we're going to see you playing along with us this week.  Remember, our challenge is now Always Anything Goes but you can use the optional twist if you want.  Happy Crafting.  NanaConnie

Thursday, August 10, 2017

Let Us Eat Cake

     This crazy little "Cake Monster" from Gerda Steiner Designs was just too cute to ignore!   It's the image from the monthly Progressive Challenge and I started working on it practically the moment I got it.  :-D


     This is actually a 'window' card in that the card front is die cut (Memory Box), leaving a scalloped hole and the image is on the inside of the card.

     I colored the image with my ProMarkers, trimmed it to the size of the A2 card and mounted it on the inside.  I printed the sentiment, fussy cut it and adhered it to the card front.  This is another ombre card front.  I bought a stack of ombre CS in various colors and I'm having a lot of fun using them for card bases.

     This time, I decided it only needed minimal embellishment, so I added the sheer, purple-ribbon bow. Because there wasn't a lot of room along the sides of the window, I added a small tab sticking into the window and then adhered the bow to it so that the tab was hidden by the bow.

     1 more card for the birthday stash.  :-D

     Challenges:
Addicted to Stamps and More
Crafting by Designs
Kraftin' Kimmie
Outlawz Greetings
Penny's Paper-Crafty
Scrapy Land
Simon Says Stamp
Unicorn 

     That's all I have for today.  Happy Crafting.  NanaConnie

Wednesday, August 9, 2017

Sweet & Cuddly?

     I'm an animal lover and cats seem to adopt me more than any other animal right now so I'm becoming known as a crazy cat lady.  I share that with all of you so that you'll have it in mind as you read the rest of this post that I'm not anti-feline.

     Have any of you ever come across a cat that just didn't want to interact with humans?  Not that he or she was afraid of humans and ran away, and not one that was aggressive, mean or snarky; just one who didn't see humans as being necessary to their survival.  lol

     This cute and funny image from Beccy's Place will show you exactly what I mean.  I know this is meant to be a Halloween image but it's versatile enough to work for any time of year.


     The image is a silhouette so the only coloring needed was on the eyes and I did them with ProMarkers and white gel ink.  The frame was made by cutting the card front with a die from Impression Obsession.  I saved the inner pieces for another project but the outer border made a very effective frame for Mr. Cute and Cuddly.  Of course, I had to glue down all those tiny bits sticking out from the frame so that they wouldn't get snagged by anything.  I used a glue pen with a very fine tip for those.  :-D

     Your eyes are not fooling you - the card base is made from yellow ombre CS which I ran through my "Linen" folder.  I adhered the image to the inside of the card front, then added the sentiment to the outside along with a single black bow.  Finished!

     Challenges:
Color Inspiration Monday
Crafting from the Heart
Creative Inspirations
Digi Choosday
Dream Valley
Pammie's Inky Pinkies
Scrapy Land
SUYP Cats
TTCRD

     OK, now that you've met this 'less-the-cuddly' character, I want you to give your own sweet feline a little pat, a little treat, and thank him/her for happily sharing your human world.  :-D    Happy Crafting.  NanaConnie

Tuesday, August 8, 2017

Owl Wisdom

     I just love this "Winter Fairy" image from Fabrika Fantasy with the wise owl on her shoulder!  Of course, I'm pretty much crazy for any of their images so that wouldn't be hard to figure out but my daughter loves owls.  Whenever I run across one in my stamping world, I grab it and make up a card just for her, often for no specific occasion.


     This time I've done another shaped card, fussy cut to match the design in the background dp.  The image and background 'sky' are done with water-colors.  I used a die from Spellbinders to cut the image and then layered it directly onto the background dp.  No added embellishment so it's a very CAS design but one which looks very complex because of the delicate die cut and the soft pattern in the dp.

     Challenges:
A Bit More Time to Craft
A Perfect Time to Craft
A Vintage Journey
Connie Can Crop
Crafty Awesomeness
Crafty Calendar
Pattie's Creations
Scrapper's Delights
Take It, Make It
World Wide Open DT

     Happy Stamping.  NanaConnie

Monday, August 7, 2017

Fish Wish

     Can you tell that my visits to the beaches this summer are influencing my crafting?  Yes, it's true but in this case, the fish image came from the Progressive Challenge at The Outlawz and it's by Tangle Street.  Not that I didn't jump in right away to use it.  :-D


I was inspired by the colors I found at Sugar Pea Designs.


     I printed the angel fish three times, in different sizes, with one of them reversed.  They're all colored with ProMarkers and then fussy cut.  I used a blue card base because it was a perfect color to represent water.

     I got the sheer, sparkly ribbon out of my stash, wrapped it around the card front and tied it into a square knot.  Then I mounted the fish using Pop Dots.  The final touch was the printed sentiment.  Clean, simple, masculine, and easy to mail.  One more birthday card for my stash.

     Challenges:
Crafting with an Attitude
Crafty Creations
Creative Fingers
Creative Moments
DL.ART Thursday
I {heart} ProMarkers
Outlawz Festive Fridays
Penny's Paper-Crafty

     That's all I have for today.  I may even venture outside today since the weather predictors are saying that we're going to have a wonderful "cool down" on our temperatures.  They don't expect it to get above 99F !!  And if tomorrow only gets to 98F (as predicted), then we will have ended our 3rd heat wave of the summer which only ran for 18 consecutive days this time.  The record setter was in June when we had a 19 day heat wave, the longest in recorded history for our area.

     And you were wondering why I've been either gone or hiding out so much this summer?  lol

     Happy Stamping.  NanaConnie

Sunday, August 6, 2017

Celebrating a First Tooth

     My children (and grandchildren, for that matter) are far too old for me to be thinking about the great occasion of a "First Tooth !!" but while reorganizing some of the storage in my house, I did run across a little plastic pill bottle with baby teeth in it.  As I read the faded label, written in my mother's handwriting so many years ago, I discovered that throughout my childhood she had saved each of my baby teeth as I lost them to the new, permanent teeth.  So, I'm guessing that the "first tooth" coming in was probably important enough to celebrate.  In any case, this card celebrates that great occasion.  :-D

     The image is from the Progressive Challenge on Sasayaki Glitter's Facebook site.  It's called "Baby Boy with Monkey."


I started with the sketch from The Outlawz
and colors suggested by Double D.


    I colored him with my Promarkers, then cut him out with a hexagon die from QuicKutz to match up with the hexagon paper I had chosen.  The patterned papers came from Recollections and everything was matted with dark chocolate CS.  The card front was embossed using my "Linen" folder and I added the two pearls for some simple embellishment.  They also give some great texture, as do all the layers.

     If a design can be simple with all those patterns on it, this one certainly is it.  :-D

     Challenges:
Crafting by Designs
Crafty Gals Corner
Crafty Sentiments
Digi Choosday
Kraftin' Kimmie
Lemon Shortbread
Word Art Weds.

     I hope you're enjoying the last day of your weekend and that you've had a wonderful, soul-refreshing, couple of days.  Look forward to the start of a new week.  Happy Stamping.  NanaConnie

Saturday, August 5, 2017

Perspectives of a 6 Year Old !

     My card this morning is a salute to a very astute, 6-year-old who has four older brothers (ages 13 through 21.)  She's the only girl and the baby of the family, a completely unplanned 'happy'-stance, and wonderfully unspoiled despite being everyone's darling.  :-D  The sentiment is an exact quote - directly from her.


   I colored this adorable Bugaboo Stamps image with my ProMarkers and followed the recipe from Catch the Bug Challenges (3 layers, pink, and scallops.)  The striped dp and the distressed pink dp (cut with the same Memory Box stitched, scalloped circle die) are inlaid so that's really a single layer.  Then I cut another scalloped circle, smaller this time, and embossed it with my Swiss Dots folder.  Finally, I added the image which had been cut with a plain circle die (QuicKutz), making the other two layers for the recipe.

     I used two different grosgrain ribbons to make the bow tie and sewed on a tiny button.  What you need to know is that Dollie, the 6-year-old, has a 5-month-old, Siamese kitten and he wears a red collar with a bow on it that looks like a bow tie.  I thought that made this card perfect for her and I'm sure she'll get a kick out of it when her own birthday rolls around in September.

     Challenges:
Crafty Creations
Crafty Gals Corner
Crafty Sentiments
Cutie Pie
Day Dreamer
Ike's World
Lemon Shortbread
Pammie's Inky Pinkies
Penny's Paper-Crafty
Scrapy Land
SUYP Cats

     We are barely starting the weekend (depending on where you are in the world) and I hope you have wonderful, restful, plans made which include lots of relaxing crafting.  Stay out of the heat if you are in the midst of a summer heat wave, or indoors, toasty and warm, if you're in the middle of a snowy winter.  Each of those are great excuses for hanging out in the craft room, right?  Happy Stamping.  NanaConnie